Project Milestone Template
Project Milestone
The original milestones were as markers used on public roads and helped the travelers determine where they are and whether they are on schedule. A Milestone in Project Management is used to signify Introduction specific point during the lifecycle of the project. A point may be the start or finish of the project or any other significant occurrence which the project deemed as valuable. Much like their original use, a Project Milestone Template Excel helps the PM determine whether the project is on track.
Scheduling milestones by default have no duration and are marked as “zero days” in the scheduling tools. When tracking their progress, the PM usually marks them either as “done” (100%) or “not done” (0%).
Main Usage Project Milestone Template Excel
Milestones make it easy for the PM to present the PvA (Plan vs. Actual) to the key stakeholders and the team members in a simple graph/chart.

Project Milestones Types
The 4 main types of milestones used in PM are –
-
Contractual milestones:
These milestones appear in the contract (or the SOW), and successfully reaching this milestone usually means that payment will be transferred from the client.
-
Critical path milestones:
Every project has a critical path (which can and will change), and these milestones are a part of it. Since they are a part of the critical way, their importance is more than those of the other milestones in project completion.
-
Quality milestones:
Since reaching a particular milestone doesn’t necessarily mean that the deliverables' quality has been met, these milestones aim to ensure the quality standards have been met.
-
Progress milestones:
The most common type, which may also be one of the three types mentioned above. These usually include the start and finish milestones, deliverables, and phase start/finish milestones.
Project Milestones Template
The natural location of the milestones is on a Gantt chart or a PERT (Project Evaluation and Review Technique) chart, but since meeting the due dates of the milestones are used to measure the success of the project, they are sometimes tracked separately. In order to do this in a structured and uniform manner, many organizations use a milestone template. The attached project milestone templates present different methods to capture the milestones –

Milestones Template – Contractual:
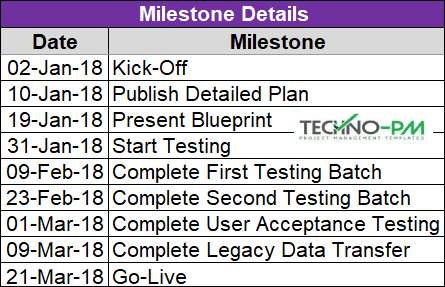
This template requires some set-up time, but it is quite simple to update once this is done. The contractual project milestone template excel presents the milestones on a timeline (alternating one above and below the timeline). If the date or milestone name is changed, the timeline is automatically updated. The milestones are all contractual in nature, and completing them usually means that a certain payment is due. To compare the planned vs. the actual, a baseline timeline is required to be frozen and then compared with an up-to-date one (in 2 separate PPT slides). To add new milestones, follow the steps listed at the bottom of this document

Milestones Template – Quality:
This template presents the milestones in a table format, with their planned and actual due dates. If the dates are equal, then the “Delay in Days” column shows a “No Delay” message in a green background. Otherwise, it displays the number of days delay in an orange background. To add new milestone rows, follow these steps –
- Choose the last row (In the template attached, they are A12 to F12), and then drag the row down, adding as many rows as required. The formula in column E should function in the new rows as well.
- Now delete the content in the other columns, and add the details of the new milestones.
- It is also recommended to choose the new cells which were added and change the border to “All Borders” in the “Home” tab.

Milestones Template – Critical Path:
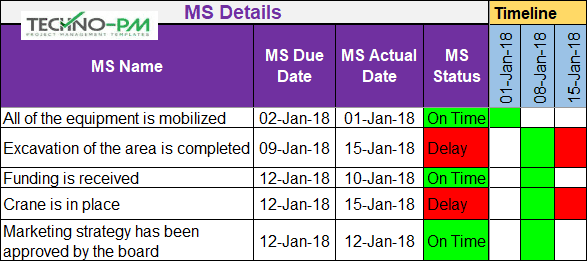
This template displays the milestones in both a table form and a timeline chart. The milestones all have unique numbers, names, due dates, actually completed dates, status, and comments. The status is updated automatically: either it presents that the milestone is “On Time” or in “Delay.” The status is on time if the due date and actual date are the same or if the actual is earlier than the due date, and in delay, if the actual date is past the due date. According to the two date columns, the timeline section is then manually updated with colored cells (Green / Red). In order to add new milestone rows, follow these steps –
- Choose the cells of the last row (In the template attached, they are A13 to T13), and then drag the row down, adding as many rows as are required. The formula in column E should function in the new rows as well.
- Now delete the content in the other columns, and add the details of the new milestones.
- Colour in the cells of the timeline in green for the due date week, and in red for the actual week if it is in delay.
- It is also recommended to choose the new cells which were added and change the border to “All Borders” in the “Home” tab.
Adding a milestone to the “Contractual” tab template –
- Add the details of the new milestone to the “Milestone Details” table in row 12 (Columns A and B)
- In the “Do Not Update” table located rows 46 to 54 (columns B-D), drag the last row down one row in order to extend the formulas one row down.
- In the row which was added, in column D - change the formula so that the height is -10 (minus 10): =IF(C55<>","-10,""). If a new row is added, then change that one to 10 (plus 10)
- Choose the chart area, and go to the “Design” tab. Click on the “Select Data” button, and the following menu will appear.
- In the Legend Entries section, choose the “Date” series, and click on Edit. The following menu will appear –

- In the “Series Value” window: Change $C$54 to $C$55, and click on “OK.”
- Do the same for the “Activity” series: Change $D$54 to $D$55, and click on “OK” –

Adding a milestone to the “Contractual” tab template 3
- In the “Data Source” menu, in the “Horizontal” area, click on the “Edit” button –

Adding a milestone to the “Contractual” tab template 6
- The following menu will appear -

Adding a milestone to the “Contractual” tab template 5 (1)
- Change $B$54 to $B$55, and click on “OK.”
- Repeat as necessary.


