Resource Leveling Using MS Project
Multi-tasking has become the industry standard for most of us, and the days of performing just one task at a time have long passed. If a resource is allocated to multiple tasks during the same time period, they might appear as over allocated (which means that they have more work than business hours).

An over allocation solution offered by Microsoft Project is resource leveling: A load balancing technique which allows MS Project to alter the start / finish dates so that the resources will be able to complete all their tasks during the available business hours.
There are 3 ways to initiate resource leveling –
Automatic
1. Each time that MS Project recognizes that any resource is over allocated the leveling process will occur automatically.
2. The advantage here is that you don’t need to initiate the leveling each time a change is made to a task, but the disadvantage is that the user doesn’t have control when the leveling will happen, and this may lead to changes being made to the task dates without the users’ knowledge.
3. This is especially dangerous while working with a medium / large work plan (50 rows or more).

Manual
- The leveling will occur once the Microsoft Project user clicks on the “Level All” button.
- The disadvantage of this option is that it requires the user to check and see if any resource is over allocated, and then initiate the leveling.
- The advantage is that the user has more control over the changes that occur following a leveling, and can track and analyze the implications of it.
Manual Resource By Resource
- This option is similar to the manual one and has the same advantages and disadvantages, but the difference is that the user initiates the leveling one resource at a time.
- This grants even more control over the changes that occur, and it’s easier to analyze them.
Step By Step Guide To Resource Leveling In MS Project
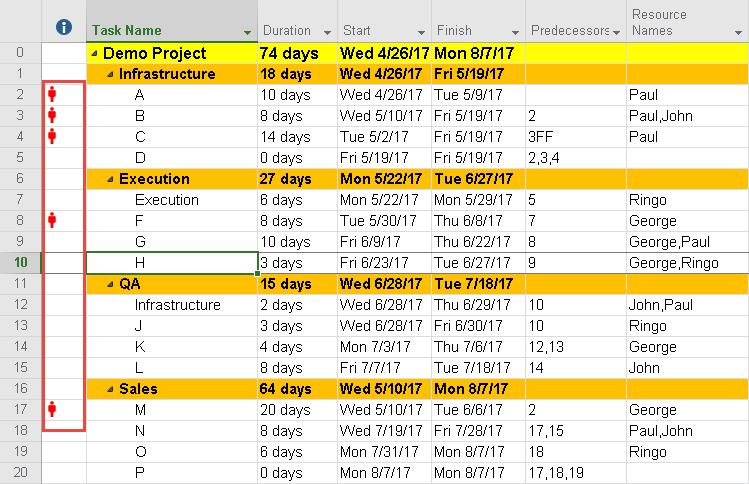
When any resource is over allocated, a small red icon of a man will appear in the ”Indicators” column:. In order to see which resources are over allocated, go to the “View -> Resource Sheet” ribbon. The resources that are over allocated will appear in red.

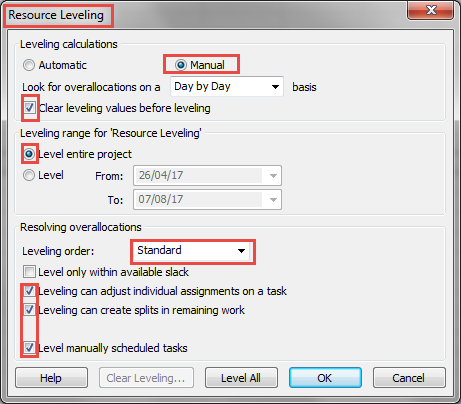
In order to initiate a manual leveling go to “Resource -> Leveling Options”, and the following menu will appear. Here you will need to set the leveling options –
1. “Look for over-allocations on a X basis”: Here you can define the time period that Microsoft Project will look for over allocations. If you chose “Day by Day” then every day that a certain resource is over allocated (has more work hours than business hours), then MS Project will change the start / finish dates. The recommended option is “Week by Week” for work plans that their duration is 2 months and up, and “Day to Day” for lesser duration.
2. “Clear leveling values before leveling”: Check this box if you want Microsoft Project to clear any changes to the start / finish dates made by any previous leveling. Basically it is a leveling undo (Ctrl Z).
3. “Level range for ‘Resource Leveling”: Here you can choose to level all over allocated tasks, or just a specific time frame of the project.
4. “Leveling Order”: Here you can choose which tasks will be leveled first. Please see details below.
5. “Level only within available slack”: Checking this box won’t allow the leveling process to delay the final finish date of the project (will only delay tasks that aren’t on the critical path).
6.“Leveling can adjust individual assignments on a task”: This is relevant only for tasks that 2 or more resources are assigned to. Checking this box will allow the leveling process to change the task dates for just one (or more) resource, but not all of them.
7. “Leveling can create splits in the remaining tasks”: Checking this box will allow the leveling process to create splits in the task to 2 or more sub-tasks. This means that the part of the task that wasn’t completed will be split from the part that was completed, and have a separate start / finish date.
8. “Level manually scheduled tasks”: Checking this box will allow the leveling process to level all tasks in the work plan, both manually and automatic scheduled tasks.
9. To start the leveling, press “Level Now”.
10. To save the parameters without leveling press “OK”.
11. Undo (Ctrl Z) won’t undo the leveling once “Level Now” is clicked, so in order to go back you need to click “Clear Leveling”.
Options For Leveling Order (point number 4)
1. “ID Only”: MSP will level the tasks according to their ID number (row number), starting first with the higher row numbers.
2. “Standard” (The default option): MS Project has an algorithm that takes 5 parameters into consideration when deciding which task to level first –
3. Number of predecessors (the tasks with fewer predecessors are delayed first)
Slack (how many days the task can be delayed without delaying the entire project)
4. Start date (the tasks with a later date are leveled first)
5. Priorities: The tasks with the lowest priority are leveled first. Setting the priority is done from “Task->Information->General tab”. You can set priorities from 0 (leveled first) to 1,000 (not leveled at all). The default is 500, and it is recommended to work with increments of 50 for a standard sized project (80 to 350 rows).
6. Constraints: Tasks without any constraints will be leveled first. Constraints are set in “Task->Information->Advanced tab”
7. “Priority, Standard”: This option is similar to the Standard one and has the same 5 parameters, with a slight difference: The priority of each task has a greater effect on which task will be leveled first. This option gives the user more control of the leveling process.
Due to the control they offer, manual options are the preferred method while working with medium and large scale work plans which involve dozens of resources.


