Payroll Implementation Project Plan Template Excel
Payroll Implementation
Like most things, implementing a Payroll solution comes down to the amount of planning and preparation that’s gone into the project. However, because of the legislative requirements and the sensitive nature of making decisions that will directly impact the method by which employees will receive their wages, a Payroll implementation brings a unique set of challenges.

Payroll Implementation Project Plan
Best Practices for planning a payroll implementation
- First and foremost, an organization must have a clear and thorough understanding of any current legislative compliance issues which need to be addressed by the implementation. Without this understanding, there’s every possibility that existing issues won’t be rectified. In fact, they could be made worse.
- Once all current compliance issues have been documented, it’s important to clearly understand all aspects of the ‘day-to-day’ Payroll responsibilities. All too often, organizations focus on ‘high-level’ information without considering the impact that decisions will have on those areas of Payroll that are more granular. This is why direct staff engagement with employees at all levels of the business is so important. Otherwise, key details may be missed.
- Always have a backup plan, and never be afraid to pull the plug and start over. In the long run, scrapping an idea that has run its course is much better than forcing something that just isn’t going to work.
- Along the same lines, it is better to delay implementation to get it right than it is to move forward to address outstanding issues later. Building a solid foundation is more important than hitting a deadline. Today’s workaround becomes tomorrow’s standard operating procedure.
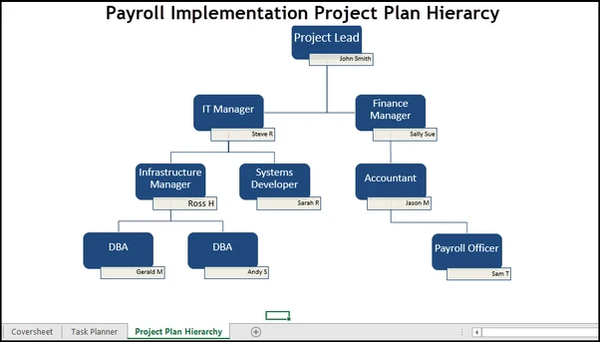
- Lastly, the main reason why projects fail is a lack of clear direction and guidance. It’s important to put the right people in key decision-making roles throughout the duration of the implementation. This isn’t always based on seniority within the operating business structure. Instead, it needs to be based on experts who are subject matter experts within the relevant task at hand.
- One key thing to keep in mind when determining responsibilities is that the data which is maintained by the Payroll department is very private. Consequently, tight control and strict security measures must be kept in place throughout the duration of the project. Always ensure that each person involved in the project has no more access than what is strictly required to complete their task.
While daunting, implementing a new Payroll solution is an excellent opportunity to make things better for everyone within the business. Whether it’s improving accuracy, cutting costs, or making the process more efficient, everyone in the organization stands to benefit.
Suggested reading - You may be interested in the Implementation Plan Template.

Payroll Implementation
How to use the Payroll Project Plan Template
This template has several built-in features that allow for easily keeping track of a Payroll system implementation. The following is a brief explanation of the use of these features.
Coversheet
- The “Coversheet” tab of the template allows the user to see at a glance what the overall status is of the implementation. It also allows for quickly drilling down to specific tasks within the implementation to determine their status.
- As shown in the screenshot below, the top portion of the “Coversheet” tab provides an easy way of keeping track of the number of days remaining in the scheduled project time.
- The following fields will calculate automatically based on the “Projected Start Date,” the “Projected Go-Live Date,” and today’s date:
- Total Project Days
- Days Used
- Days Remaining

Coversheet
In addition to the above fields, the template will automatically generate a chart displaying how many days have been used vs. how many days are remaining. This allows the information to be more easily interpreted in a presentation/project meeting environment. If the user accidentally deletes the chart, the template will automatically re-create it the next time the workbook is opened.
The template allows a user to quickly and easily generate a graph that displays specific project tasks' progress. This is managed by choosing a project task from the “SnapShot View” drop-down menu. If the user accidentally deletes the graph, it will automatically be re-created once a selection is made from the “SnapShot View” drop-down menu.
Task Planner
- The “Task Planner” tab within the template is what drives the “SnapShot View” drop-down menu on the “Coversheet” tab.
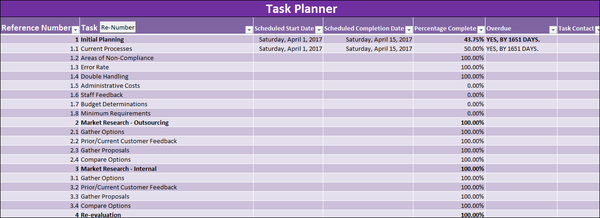
- The information within the “Task Planner” is also what’s used to populate the progress graphs. For the template to work as expected, it’s important to keep in mind that the template uses column B to determine the difference between a primary and a secondary task.
- To mark something as a primary task, simply format it in bold. If something is a secondary task, it needs to be formatted as normal (IE not bold), and it must sit beneath the relevant primary task.
- In the example below, “Initial Planning” is a primary task, whereas everything from 1.1 -> 1.8 (as per the “Reference Number”) is a secondary task that sits within “Initial Planning.”
- There is no need for the user to manually key values in the “Reference Number” column. Once all primary and secondary tasks have been completed, clicking on the “Re-Number” will automatically determine the task hierarchy and number them accordingly.
- In addition to creating a reference number, clicking the “Re-number” button will also automatically insert a formula into the primary task columns that result in a percentage of completion calculation for all primary tasks. This means that the template will automatically calculate a percentage of completion for the primary tasks based on what the user enters in the relevant secondary tasks.

Task Planner
An example of this can be seen below:
Lastly, the “Re-Number” button will automatically populate the “Overdue” column with a formula that will determine whether or not a task is overdue, and if so, by how many days. For example, in the screenshot below, the value of F3 has been determined by the following formula: =IF(E3<100>"",TRIM(C3) >""),IF(AND(E3<100>D3),"YES, BY "& TRUNC(NOW()-D3,0) & " DAYS.","NO" ),""),"")
This formula is dynamically created when the user clicks “Re-Number,” which means that more rows are required in the event there’s less risk of human error. The result also allows seeing at a glance where there are scheduling/deadline issues.


